Terraza

Terraza
Terraza y Alberca

Tuesday, October 28, 2014

A few progress shots

A pool view from what will be the steps coming down from the kitchen area.
Back of the pool area where the wooden pergola will be.
The pool inner reinforcing which will be covered by a 2 inch concrete wall. As I mentioned before I had #5 vertical bars added to counter any pressure caused by the backfill at the top of the wall.
Compacted backfill at the terrace area where columns will support arches which will carry the "losa" slab on top.

Tuesday, October 21, 2014

Mamposteria pool in the making.

This is what a mamposteria pool looks like before the final concrete layer covers the walls and floor. The floor slab will have a double layer of reinforcing and the walls a single two way layer.
Walls are 30cm (12") in thickness on the average and are built from the stone broken up from the excavation and put together with mortar. Those walls seem to be pretty heavy and solid but I have seen what backfill pressure can do over many years so I am having added vertical reinforcing placed on them. They have placed concrete piers every 2 meters (6 feet) or so, but I don't think this helps since those piers are not extended below the footing base. Having those piers does split the wall into smaller panels but it also creates a cold joint which can develop cracks under uneven pressure. The added reinforcing placed at the inner shell should help keep the wall from shifting.
Our pool will be about 7 x 9 meters (23 x 29) feet. It will not be very deep, only 1.5 meters (5 feet).

Thursday, October 16, 2014

Leveling beam (Cadena de cimentacion)

Placing the leveling beam on top of the footings. As I mentioned before the purpose of this beam is to start the masonry wall from a level even surface. The wire cages (castillos) have no structural value and their only job is to hold the concrete together and serve as crack control.
Another view of the "castillos" being placed on top of the mamposteria footings.
Framing of the "cadena de cimentacion" ready for concrete.
This is how it looks after the water proofing (moisture control) has been applied.
Another view

Monday, October 13, 2014

Rebar Column cages

Rebar column cages full height to second floor. A word about rebar use in Mérida. Having worked with rebar for the last 30 years I can eyeball if a footing, column or beam is over or under required design. When I first came to Mérida I would stop at construction sites and observe how they did things. I would take note of the column or beam cages and their span then I would go home and run calculations on them. I found out that in many cases they run extremely close to the lowest tolerance and sometimes deficient per ACI (American Concrete Institute) code standards. I knew that I would be building one day so I figured is best if I understand their methodology. What we have to know about reinforcing is that "more" is not necessarily better. The key is the placement of the steel where is needed and often if you place it correctly you need less. When we get to pouring beams in place I will be sharing rebar calculations to show how I came up with the right steel distribution.
Poured in place concrete piers. As you can see in the picture to the left there is a "castillo" cage extending from the footing. Ideally this would have been poured monolithic with the foundation but since it is a mamposteria footings that is not the case. the mamposteria is stopped at each side of the pier and because it is a stone wall it is a very irregular surface which provides adequate bonding to the concrete.
There will be a leveling beam (cadena de cimentacion) placed on top of each of these footings. This is a wire reinforced beam which only purpose is to provide a level starting point for the CMU (Concrete Masonry Unit) wall. This beam is painted (covered) with a tar like substance which serves as a vapor (moisture) barrier up the wall.

Friday, October 10, 2014

Mamposteria foundations

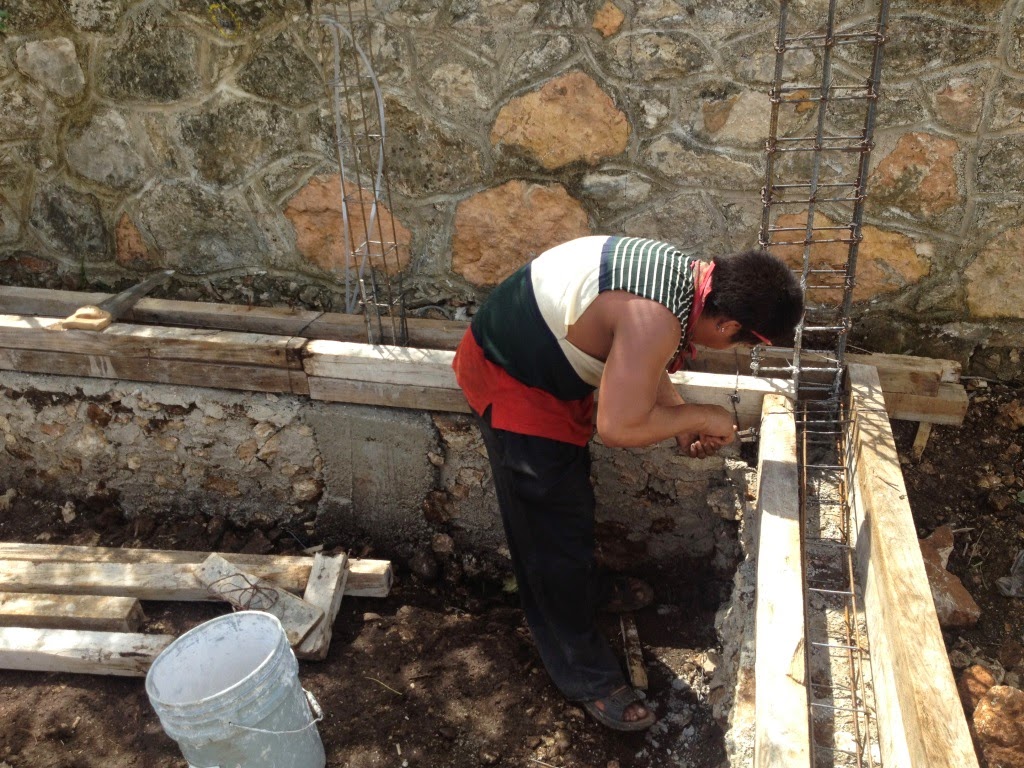
The rebar cages embedded into the footings are called "castillos". They are placed every 2 (6ft) to 3(9ft) meters vertically and also horizontally. This is done to break down the walls into smaller panels making it stronger. Some are field made of larger diameter rebar and some are bought pre welded and usually are a smaller diameter wire. They are concealed into the finished wall and you really don't know where they are. A pre made castillo costs around MX$90(US$7) and it is 6 meters (20 ft) long. The ones made on site will depend on the size of rebar used.
This is a mamposteria wall in the making. The one shown in the picture will serve as a retaining wall since it will have compacted backfill on one side. I was reluctant to use this type of wall in my house at first. I have always worked with poured in place concrete and I feel it is a more monolithic construction. But after seeing the many structures in Mérida Centro, some which are hundreds of years old, and are still standing I reconsidered. A few factors to consider when using this type of construction are; the expertise of the crew, using stone which comes from your own site excavation and of course the more expensive cost of ready mix concrete and formwork.
The stone harvested from excavating footings and other such as septic, cistern and the pool is recycled into the foundation. Some builders will have you believe that they have to purchase it, but in fact most of it is found onsite.
This is a great picture to illustrate a couple of things. It is from the side wall of the pool excavation. I have encircled in white a portion that clearly shows the topsoil layer and the bedrock. Once you dig about half a meter (20 inches) you find hard rock, and as you can see in the picture it is massive. This is why a mamposteria foundation works so well here and nowhere else which does not have that rock. The structure is basically sitting on a big stone which serves as a firm base for your foundations. This is pretty much typical everywhere in Yucatan except of course the coast where if you dig deep enough in the sand you find the same rock. This also explains the lack of storm sewers in Mérida streets. Could you imagine breaking that rock throughout the city to lay sewer pipes?

Wednesday, October 8, 2014

Foundations

Sand and gravel ready for mixing. I strongly advise in getting construction materials prices before hand. Also get a good handle into the cost of labor per day. That way when you get an estimate you can calculate what the cost is and figure just how much the middle man is pocketing to get it done. Of course if you are directly supervising it is much easier but that is not my case.
Hand digging footings. Yucatan topsoil is very shallow. There is no more than 30 to 40 centimeters (little over a foot) of organic topsoil and then you find rock. This makes for a shallow trench of no more than 60cm (24") deep for footings. Unlike the north in Yucatan you don't have to worry about ground frost levels and your foundations can be at any depth as long as they are on solid undisturbed rock.
Rebar (Reinforcing bars) Yes, houses in Mexico have lots of it. The good thing is you find it just as you would in the U.S. The denominations are the same in eights of an inch. For instance a #4 bar is 4/8" diameter or 1/2". There are also metric denominated rebars in which case is easy to convert and there are tables to help you do that. A #4 would be a 13mm in metric.
Starting the foundation. A bit unusual method of laying out the footprint. They use lime dust to mark where to dig and laborers seem to know which side of the mark to dig. You really don't see the corner stakes and level lines we are accustomed here in the U.S. But like many things this is how they do it and don't try to change their habit, you may end up with costly mistakes.

Tuesday, October 7, 2014

Pool excavation time

When I purchased this lot the previous owner (Canadian) had already started the pool excavation. That saved me some equipment rental money since all we had to do was finish it to our size. But if you have to dig one from start it could cost about 4 to five days of backhoe rental.
There is plenty of heavy equipment for rent in Yucatan specially if your site is near the city of Mérida. You can get a backhoe rental for around MX $3000/day which at this time is around US $225, and rental includes the operator.
Digging the pool area. Our pool won't be too deep just about 6 feet.

Monday, October 6, 2014

Foundation markings

Starting excavation. A land survey was previously done and there are markings to go by while digging.
First footings trenches. It is actually cost effective to have some of the shallow trenches done by hand. A laborer will earn anywhere between MX$ 220-300/day. If you have to go deeper than bedrock level then a backhoe is best and probably the only way. You see backhoes with hydraulic breakers attached everywhere around Mérida.

Pre-construction

Privacy Fence in place. Known as "Tapial" it was put up in one day. it is 22 meters (71ft) long and about 2 meters (6ft) tall. Cost a little less than US$1000.
Temporary material storage shed. A very basic shelter for your cement, tools and anything else you need to keep dry when those afternoon storms roll by.

Site preparation

Clearing the lot. It is a 1000 square meter lot walled on three sides with a beautiful artisan stone wall called "mamposteria". A wall like this runs about MX$ 1000/m3 (yes it is measured in cubic meters) usually 35 to 40 cm wide. This wall is 106M (344ft) long by 2M (6.5ft) high. About 74m3 which works out to be MX$ 74,000 (+/- US$ 6000)
It took three days of backhoe rental and also a dump truck to haul away all that was removed from the site. I had them scrape about 8 to 10 inches of soil to ensure the stubborn weeds would not come back so soon. In all I paid MX$11,000 (US$900) for that work.
The lot has been cleared of all vegetation and ready for excavation. Now the land surveyor will take reference elevations using the street level as a benchmark. I am going to elevate the house floor level above street level. I should point out that in Yucatan there are no storm sewers or manholes out in the street, so it makes sense to have your house above the natural terrain or you may end up flooded.

Ground breaking at construction site and beginning of Blog

Finally breaking ground on the construction of what will be the house I retire to in about 10 years (hopefully won't take that long to build). It is an ambitious project designed by me with some future plans for it. I will be posting progress the best I can. I should mention that I am having the house built while I myself still work in the U.S. I am an engineer and have extensive knowledge of concrete construction. Building in the Yucatan(or most of México) is quite different than in the U.S. Most structures there are built with CMU and poured concrete. They are sturdy and made to last. The one predominant technique in the southern states is a composite of plank and beams called "Vigueta y Bovedilla", it is a speedy and economical style suited for places where there is little or no risk of lateral movement such as those caused by earthquakes. My house is designed this way. I have a generous budget for this house but it is my goal to see just how much house I can get for my hard earned dollars. The house as designed would easily run well over 1M in the U.S (Depending where in the US it could even be more). I already own a house and other properties in the city of Mérida and make regular visits to the peninsula. I am quite familiar with material pricing and the labor market. I will be sharing my experiences as the project develops. Feel free to comment and ask questions I will respond the best I can.

Computerized Architectural renderings.

Front façade
Backyard and pool area
Interior staircase.
Another view of backyard and pool area.